Click here to go to the Tersus web site
START YOUR SECOND APPLICATION IN 2 MINUTES
1) Start your second application - With Instant Results
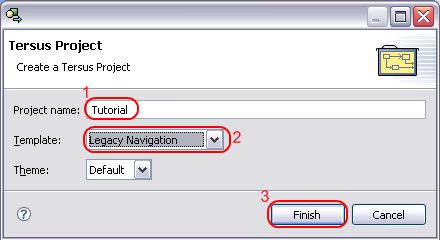
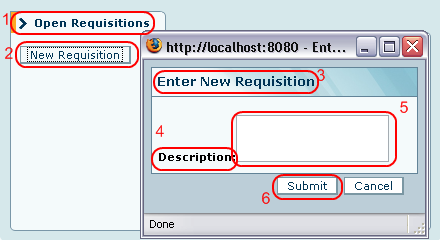
We shall now start another application which would serve as a basis for the Tersus Tutorial (see details below):
  • Switch back to the Tersus Studio.
  • Select File->New->Tersus Project to open the New Tersus Project wizard.
  • Enter a name of your choice (e.g. Tutorial) for your new project, select the Legacy Navigation (2) template, and click Finish (3).
  • Click the View (1) template in the Display category of the Palette, then click in the Tutorial system model in the editor.
  • When prompted to give a name, call the view Open Requisitions (2).
  • Double-click the Open Requisitions view model, to zoom into it.
  • Click the Button template in the Display category of the Palette, then click in the Open Requisitions view model. Name it New Requisition (3).
  • Double-click the New Requisition button model, to zoom into it.
  • Click the Popup (4) template in the Display category of the Palette, then click in the New Requisition button model in the editor, to position the popup (5) in the button.
  • When prompted to give the popup a name (with the default being Popup). Name it Enter New Requisition (6).
  • Double-click the Enter New Requisition popup model to zoom into it.
  • Click the Label (1) template in the Display category of the palette. Drop it into the Enter New Requisition popup. Name it Description: (2) (include the colon)
  • Click the Text Area (3) template in the Display category of the palette. Drop it into the Enter New Requisition popup. Name it Description (4)
  • Expand the Footer model, and rename the OK button to Submit.

2) View the results
  • Save your changes (through File->Save menu option, CTRL+S shortcut or the Save toolbar button).
  • Click on the Launch the application button in the studio's main toolbar to load your application in the embedded Tersus Server and open it in a web-browser.
  • Note the name of the view (1), and button (2).
  • Click the New Requisition (2) button to open the Enter New Requisition (3) dialog.
  • Note that all elements you edited appeared, including the Description: (4) label, Description (5) text area, and Submit (6) button.

3) Check Out the Sample Projects
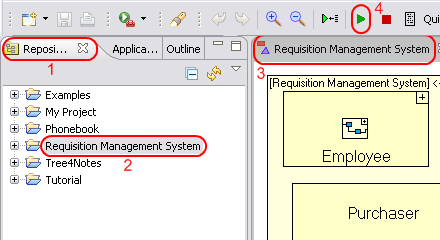
The Tersus Studio is installed with sample projects, which provide modeling examples of real-world applications, and can help you improve your modeling skills.
To view and customize the sample models:
  • Switch back to the Repository Explorer(1) view.
  • Double-click(2) any application to open it in the Model Editor (3)
To see the samples in action - use the Launch the application (4) button in the studio's main toolbar.

4) What next?
We recommend that you follow the Tersus Tutorial. Details on the tutorial, are available here.
Note that if you followed the steps above, your model should be similar to that created in Stage 2 of the tutorial. You are welcome to read through stages 1 and 2 to get more detailed information, or you may wish to continue directly with Stage 3.